I love movement and I love celebrating, thus I always strive to create movement-rich celebrations. For years, I’ve done a movement advent calendar at the end of the year as a thank you to my readers, and as a way of inspiring people to move more in their daily lives. No fancy equipment, just us moving joyfully together during a busy time of year.
Check out the other advents here:
EXERCISE ADVENT 2014: Walking
EXERCISE ADVENT 2015: Upper Body
EXERCISE ADVENT 2016: Core Strength
EXERCISE ADVENT 2017: You DO Know Squat
EXERCISE ADVENT 2018: Get Heavy
EXERCISE ADVENT 2020: With a Twist
EXERCISE ADVENT 2021: Take A Breather
EXERCISE ADVENT 2022: A BUTT For The Holidays
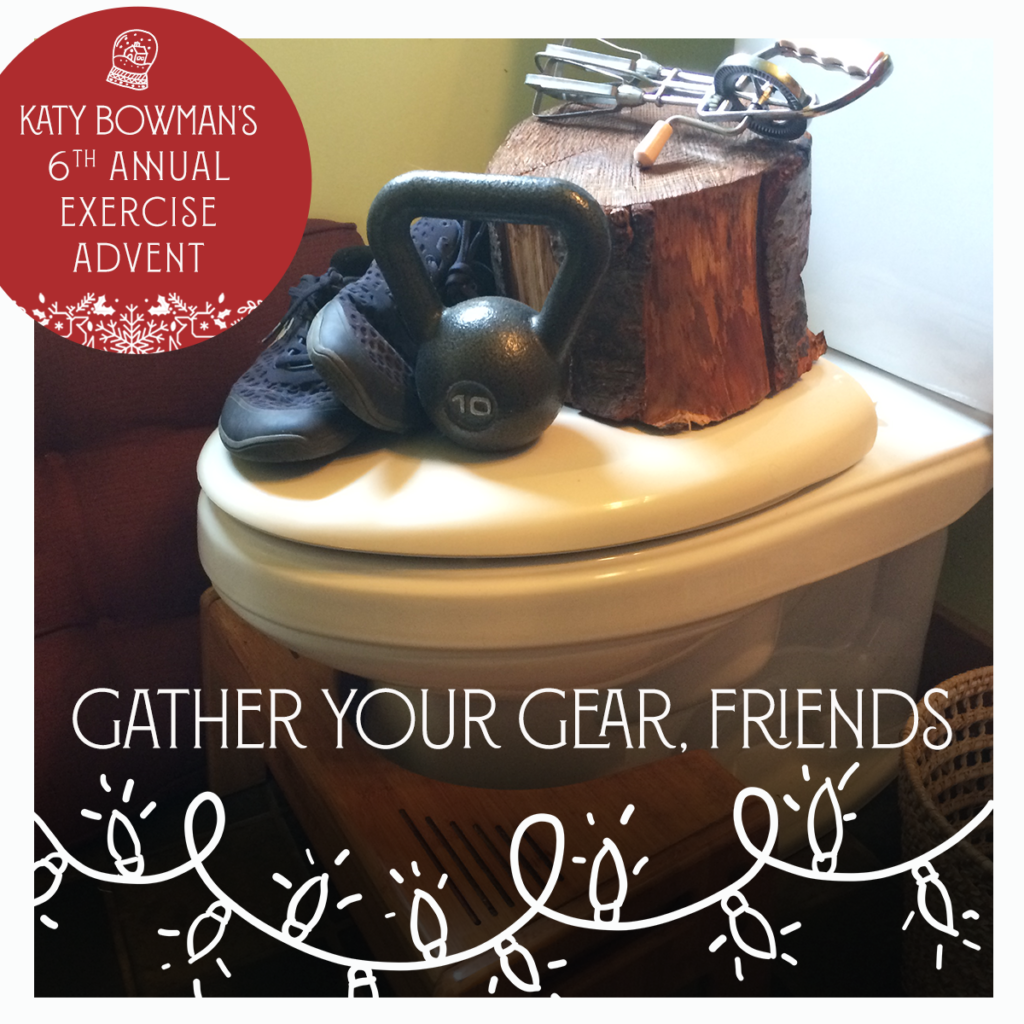
What equipment do you need for this year’s #dynamiclivingspace exercise advent? YOU DON’T NEED ANY. All the exercises are built around things most people can find in their current environment or gather/hack pretty easily. Are you ready?
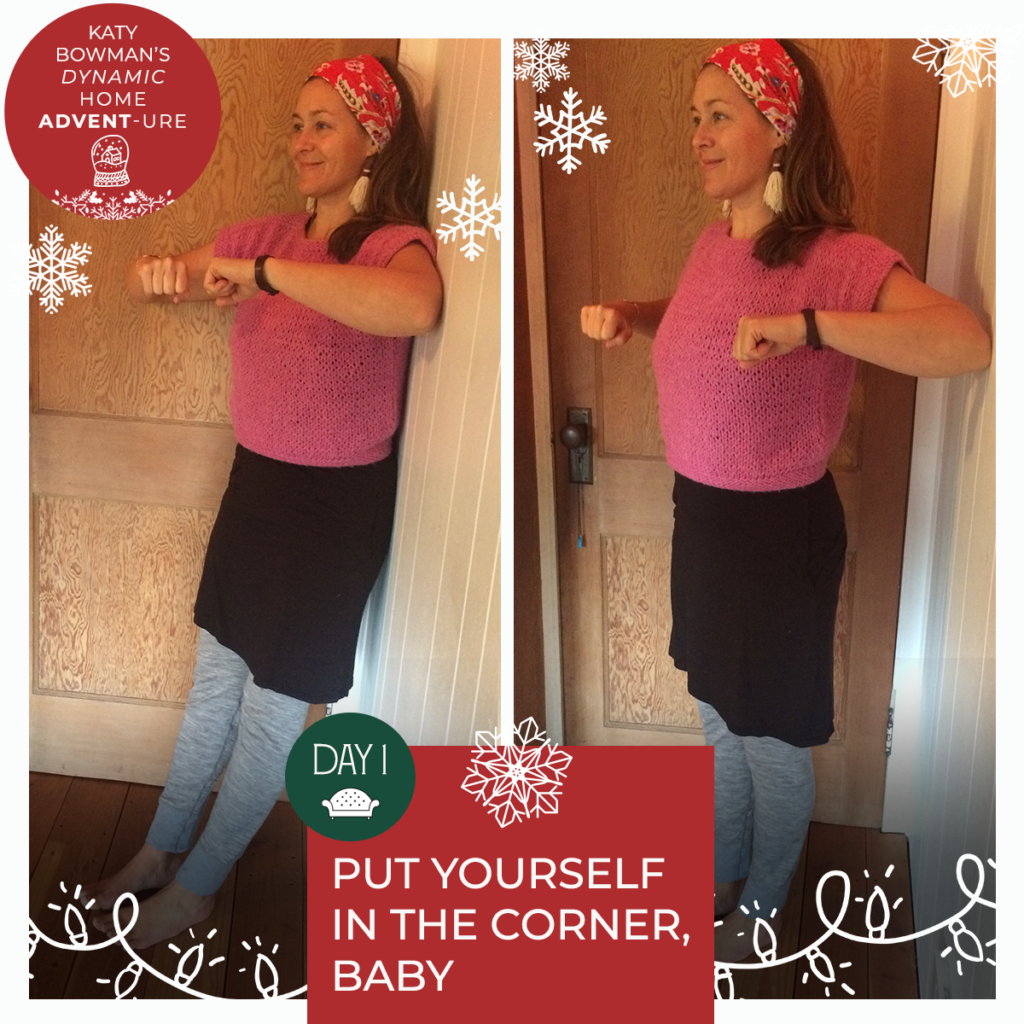
Day 1: Put Yourself in the Corner, Baby
Wall space can be more than a place to decorate, it's also a surface for moving upon, and this corner move is a great place to launch this year's exercise calendar!
Start with your body resting in a corner, feet out in front 1-2' (farther makes it harder). With arms out, press your upper arms back into the wall to move your body away from the corner, then slowly lower yourself back. Do a bunch, paying attention to your shoulders. Do they hike up? Try to keep them down. Do your shoulder blades come together as soon as you start to press forward? Try a few keeping your scapula wide longer (using more of your shoulders vs. your shoulder blades).
MOST IMPORTANTLY, smile and have fun. This movement is a GIFT!
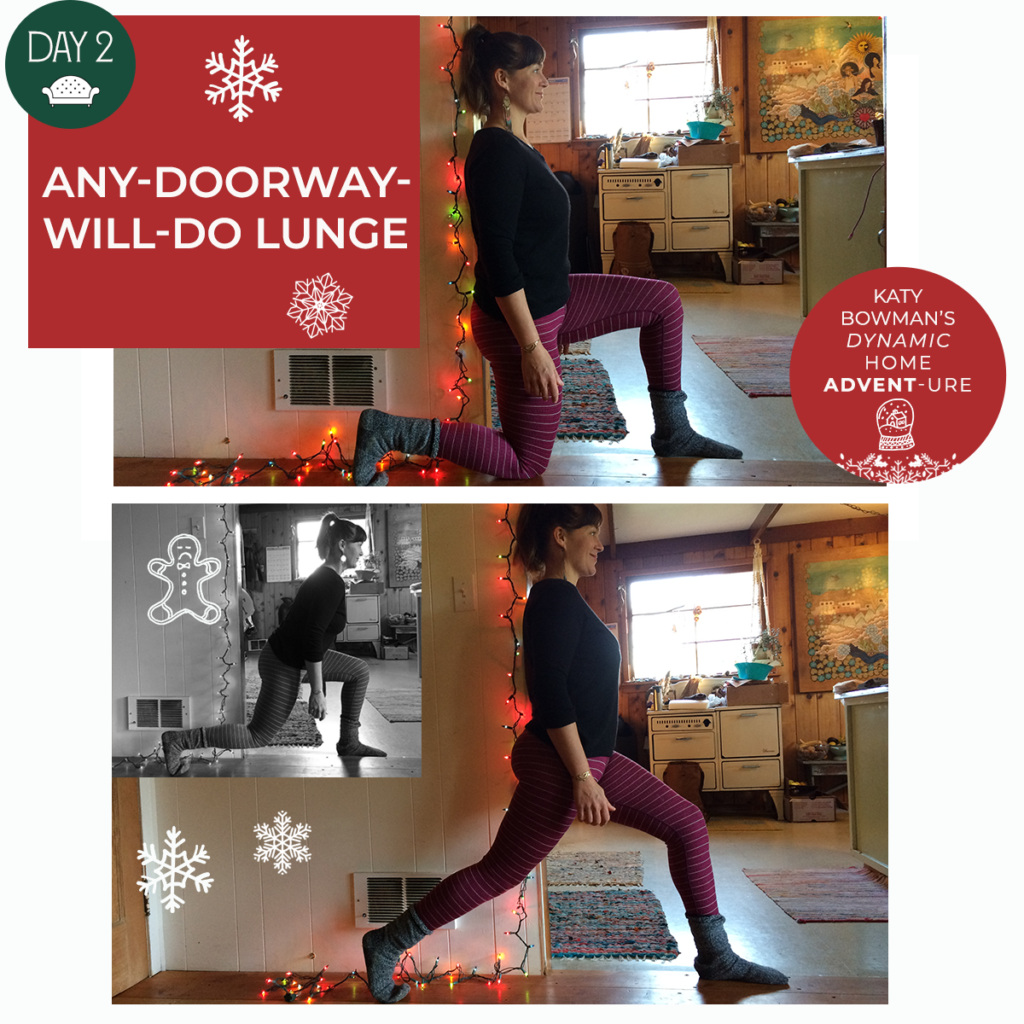
Day 2: Any-Doorway-Will-Do Lunge
Your alignment dictates the loads created when you move. The straight lines and planes of your home can help you observe HOW you're moving when you do.
Set up a lunge inside a doorway, with your torso resting inside the frame to assist you in managing an upright alignment. Keep your head and back against the frame as you move up and down.
Torso wants to lean forward? Ribs want to thrust from the doorway? More on that here:
Bolster tip: If you can't get up w/out floating your body forward, elevate your back knee on some stacked towels or yoga blocks.
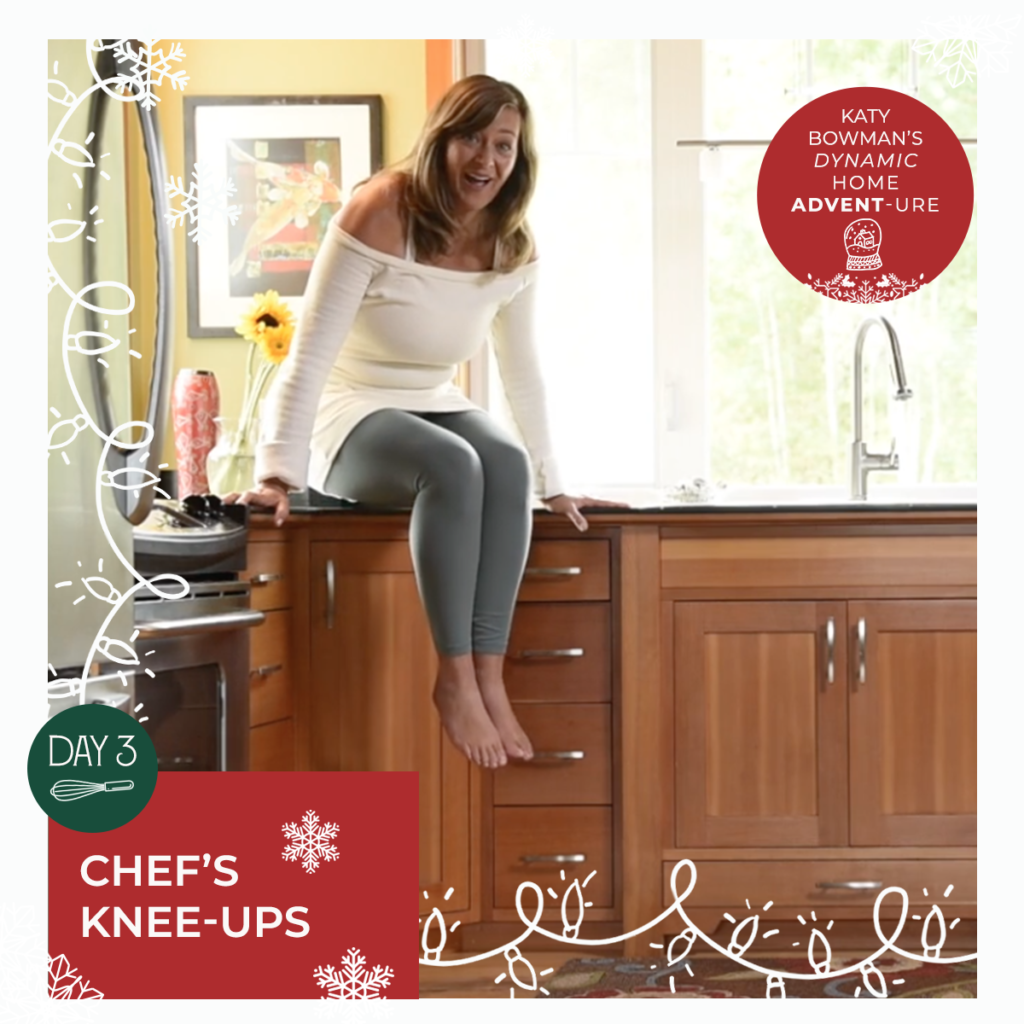
Day 3: Chef’s Knee-ups
Get your back into a counter corner (any similar configuration works; kitchen not required), placing hands to your right and left. Holding your weight in your arms (keep your shoulders down!), slowly bring your knees toward your chest. Too much? Work one knee at a time, or, just hold your weight on your arms. Repeat until whipped!
I'm going to suggest that you add these exercises together every day, meaning every day your routine is getting LONGER.
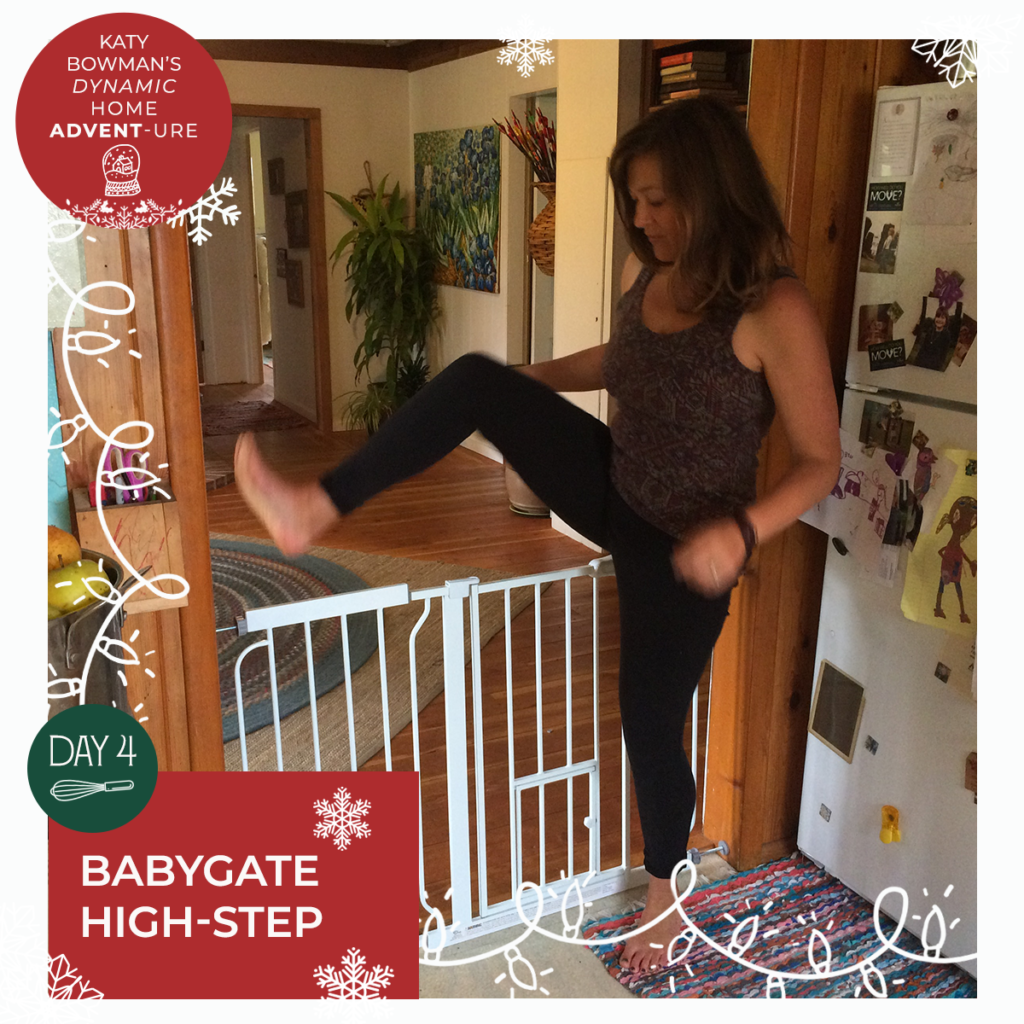
Day 4: Babygate High-Step
Do you have to step over anything on a regular basis? It's not only good for the strength and mobility of your lower half, it's also lots of FUN to set up a place where you can get this move a few times daily.
What height can you comfortably step over (you can scale this as needed). Try stepping over leading with your right and then left leg. Use a baby/dog gate, or string in a doorway or between two chairs to make this for yourself and others who want to join in.
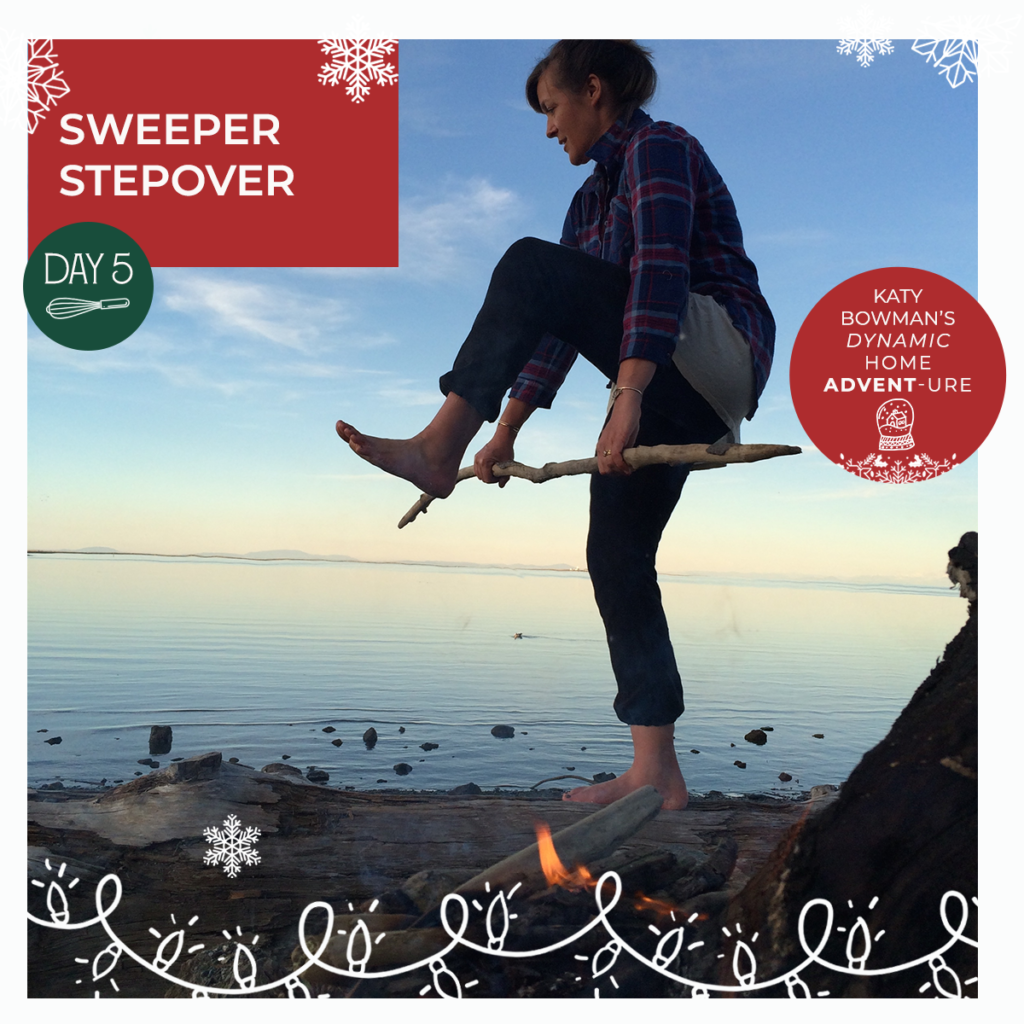
Day 5: Sweeper Stepover
This move can be a more challenging version of the gate stepover, because it can require the spine flex more (you can reduce this need by opting for something more flexible than a broom).
Broomstick in hands (or use a soft belt if you want to let it slacken for an easier pass), step over and back with one leg, then repeat on the other side. Then try stepping over with both legs before coming back with both. I KNOW, RIGHT!?
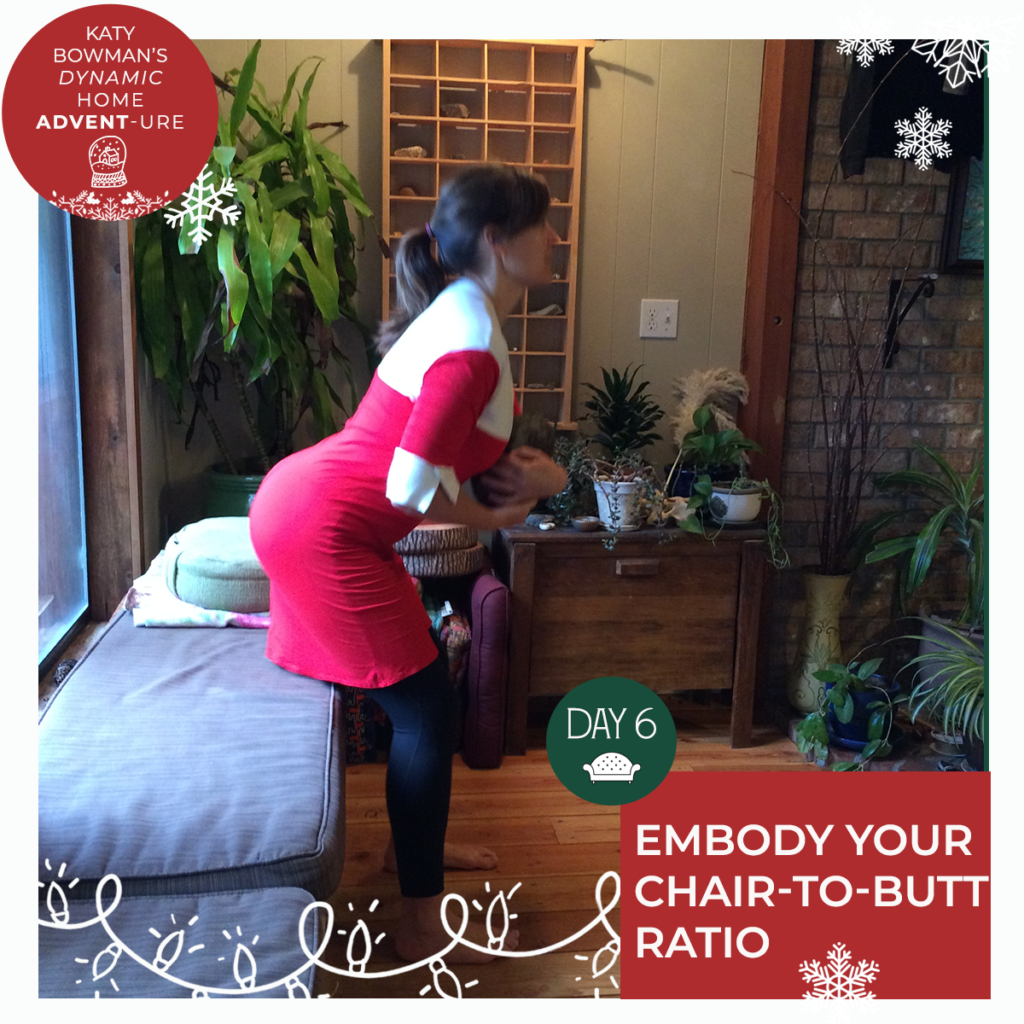
Day 6: EMBODY your chair-to-butt ratio
So, you're working on changing your body, but sometimes that can start most easily by taking a long hard look at the ENVIRONMENT that body is in, and what sort of body-environment responses constantly being created.
Your first exercise is to calculate your CHAIR to BUTT RATIO of your living space.
Count all the seats/chairs (X) and all the butts (Y) in your home to find the chair-to-butt ratio (X:Y) of your living space.
Second, you're going to embody that ratio. Sit your butt into each chair, one after another.
Then to compare, sit on the floor and then rise between each chair-sit to take the difference that chair makes beyond theoretical.
What's your ratio? And how would you describe the mechanical difference between sitting on a chair vs. on the floor next to it. What parts get used or not? How are they used or not?
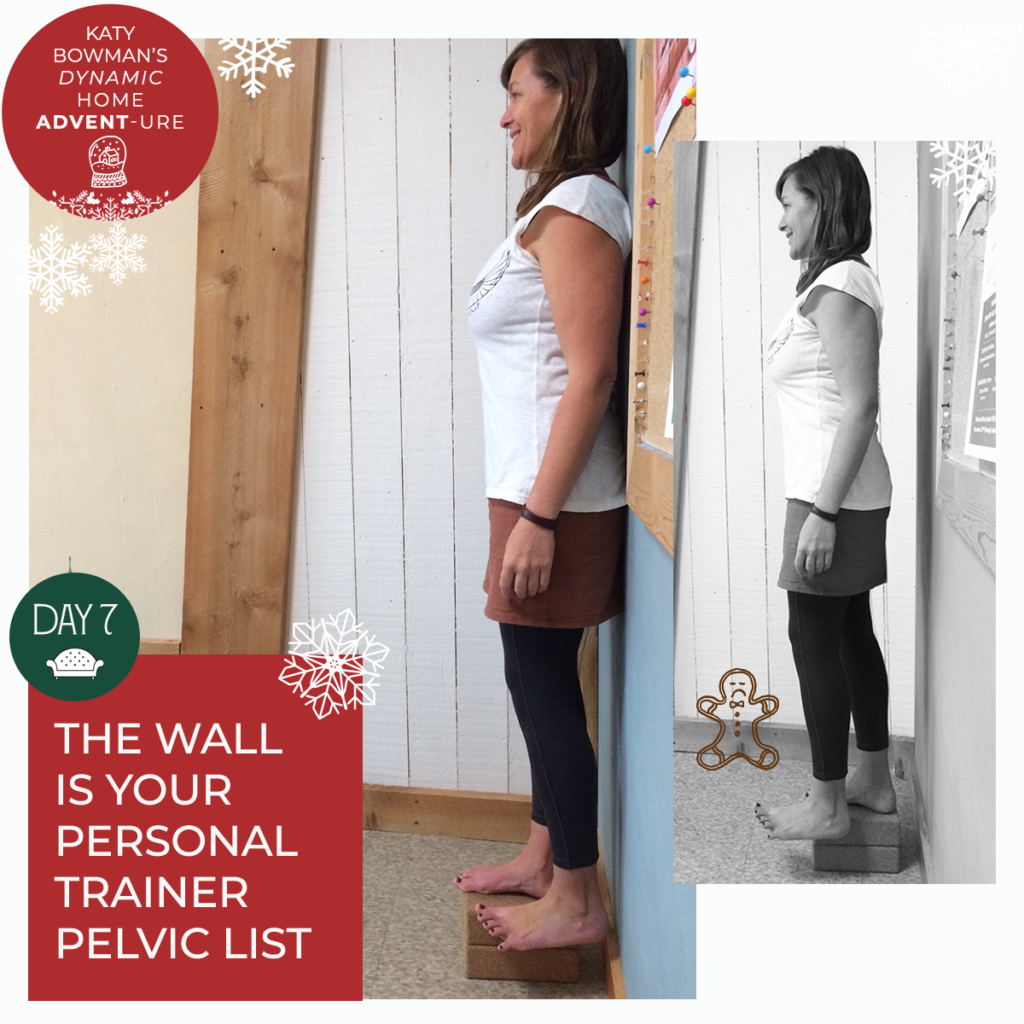
Day 7: The Wall Is Your Personal Trainer Pelvic List
For this move, you’re going to pair a Pelvic List (watch video here) with the alignment assistance offered by a wall.
Stand with your pelvis and ribcage against a wall, a small stack of books or a block under your right foot. Push your right foot down into the stack, which will cause the left leg to rise away from the floor. List up and down for a minute on each side, keeping your pelvis, ribcage, and shoulders against the wall.
Use the wall as a surface to guide your hips and torso back into a more vertical position, and notice if your body wants to move (forward lean or twist) away from the wall in order to use your hips in this way!
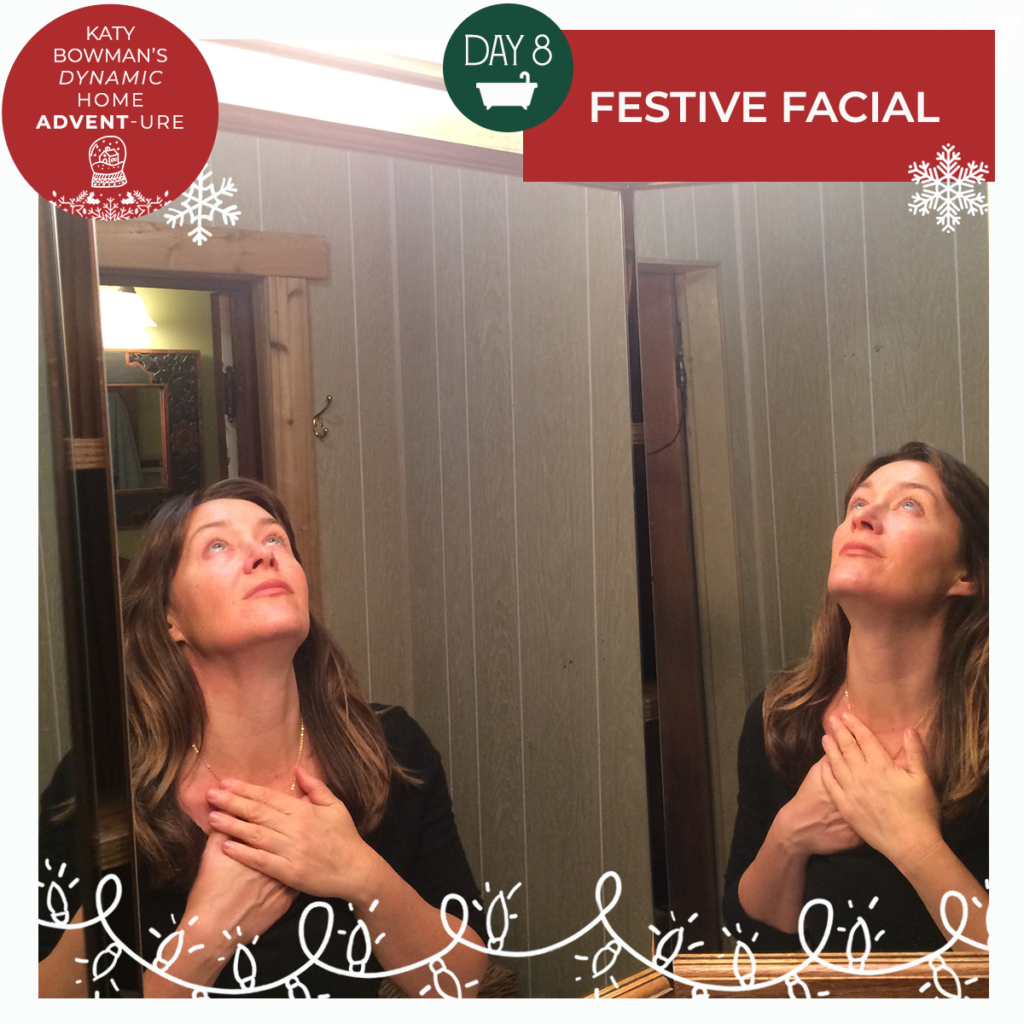
Day 8: Festive Facial
Mirrors are a great place to watch your alignment, and this platysma (muscle between the collar bones and the jaw) stretch is a great way to give your head and neck a change from so much head-forward-and-down time.
Press one hand into the skin (not your shirt) over your sternum and traction/drag this skin downward. Sliding your head back first (ramp it!), lift your chin as you let the head fall back. From here you can trace a rainbow shape with your chin to move the stretch around or, EVEN MORE FUN, push your bottom teeth past your top teeth and feel all those new movements!
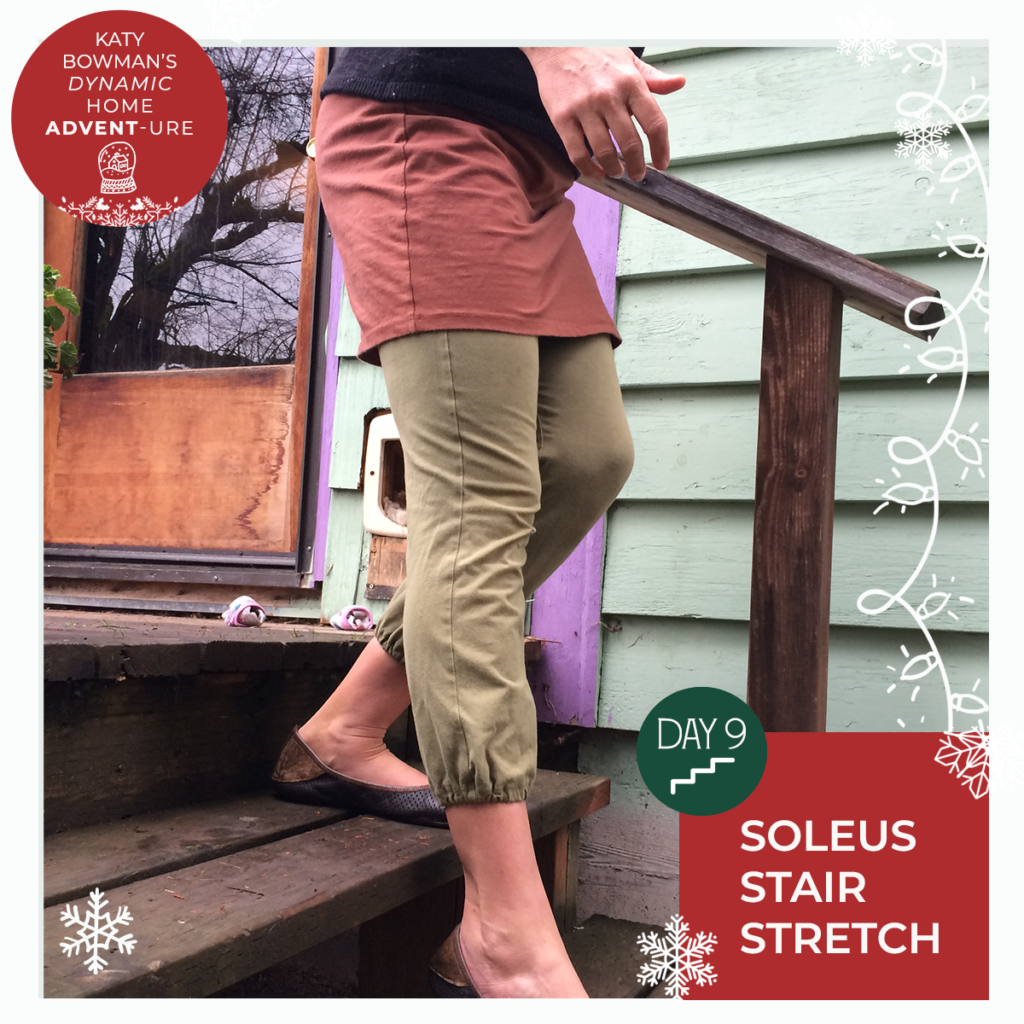
Day 9: Soleus Stair Stretch
Elements of up and downhill gait can be found in the steps and stairs in almost all our environments, and your ability to take them well depends a lot on the strength and mobility of the ankles.
To see how your soleus (one of the three calf muscles) is working when stepping down, pause to do this move next time you’re walking down a set of stairs.
Keeping the heel of your right foot down, reach your left foot down to the step below to see if you can touch that step with your toes or drop that foot down flat without lifting the heel of the foot above.
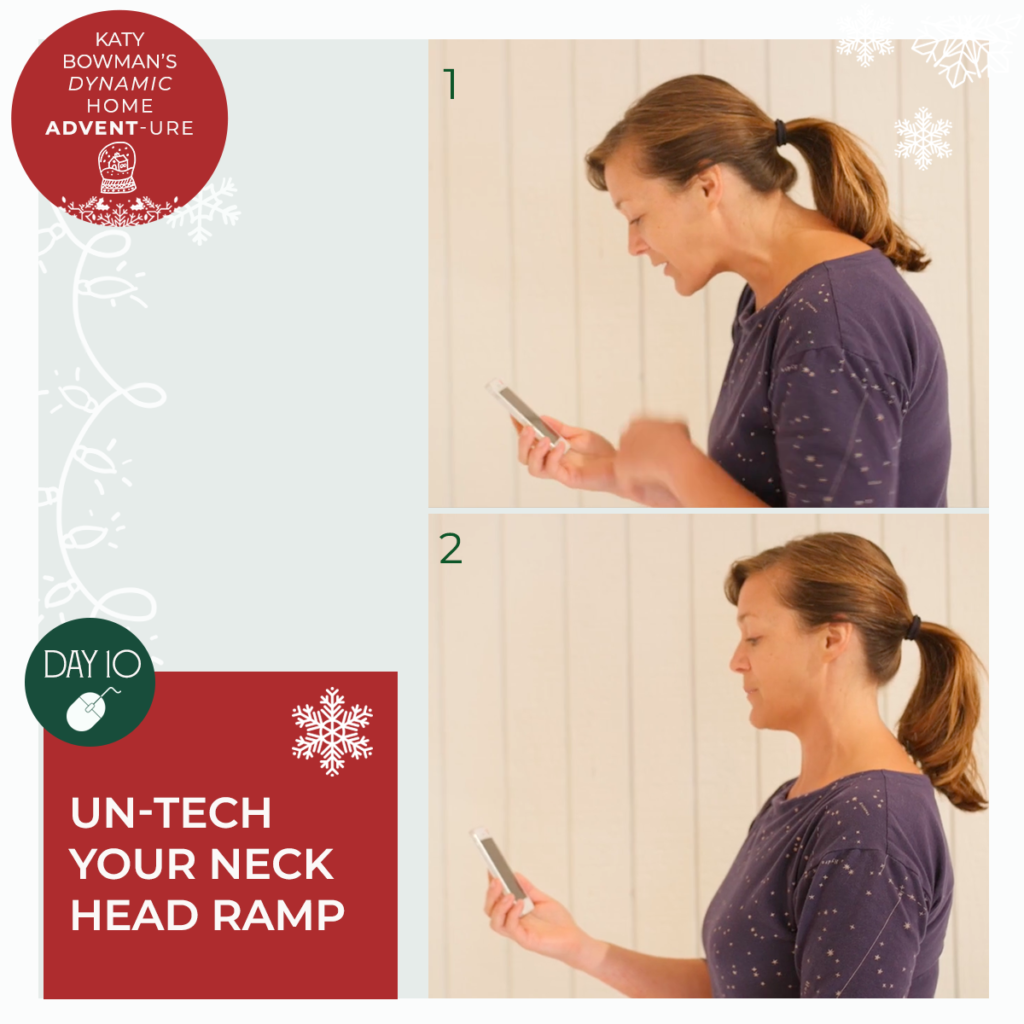
Day 10: The "Un-Tech Your Neck" Head Ramp
A screen has become a common environment (more common or at least as common as a chair, perhaps), and like sitting, screens tend to come with repetitive physical positioning. Today's move is different option for you to try.
As you look at your screen, slide your head back as well as reach it toward the ceiling (you'll be pulling changing your cervical and thoracic spinal curves) until it stacks closer to your shoulders.
This move is not screen-specific; you can add it in to your sitting, standing, walking, and other exercise time too, making it a kyphosis-decreasing movement you can do about 3,000 times a day.
I've made a video breaking down what the ribcage, head, and neck are doing during the Head Ramp. Watch that here.
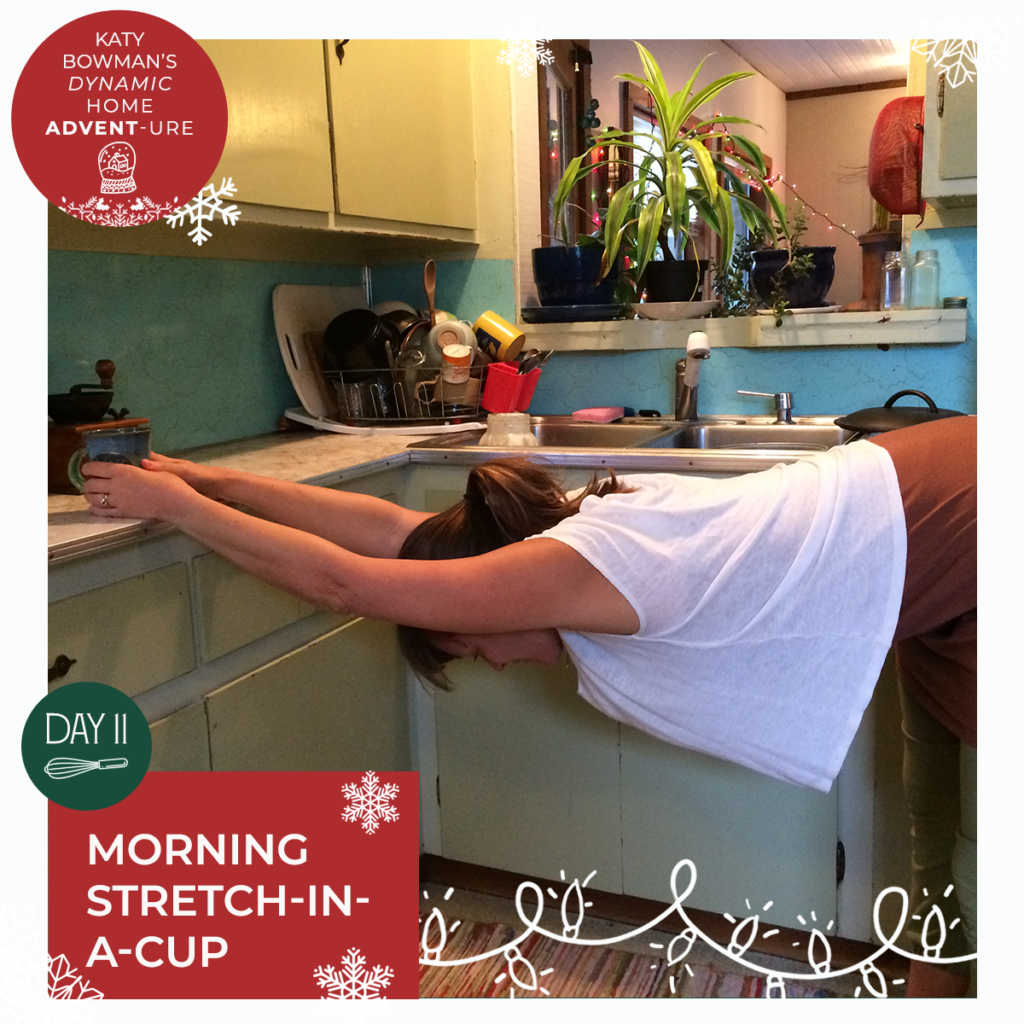
Day 11: Morning Stretch-in-a-Cup
A daily morning beverage can be a reminder to move your shoulders and upper back—expand your daily drinking ceremony!
Placing your hands around your mug (or just on a counter is fine too!), walk back until your arms are stretched out, lowering your head and chest through your arms for an upper-body wake-up!
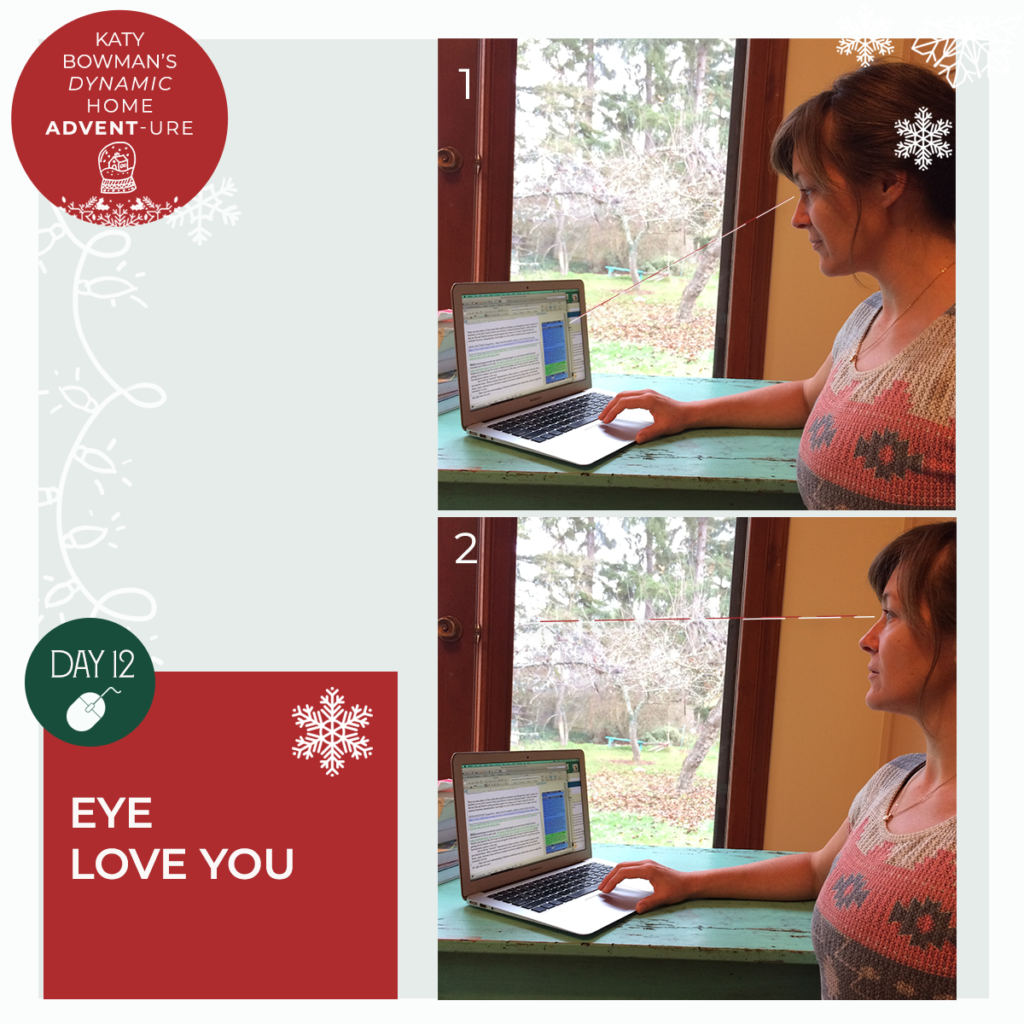
Day 12: EYE LOVE YOU
When we think of movement and a body's need for it, we tend to limit the application of this idea to the musculoskeletal system, but there are many other parts that need a range of use and are missing it in our modern environments (read Move Your DNA to expand the idea of exercise and what parts need it). So, I'm including your EYES in this exercise advent, because the "shape" of your environment includes the distances you can look to. Every distance you focus on results in a different position of the ciliary muscles in the eye. The distances you most often look to are the most repetitive positions for the lens in your eye.
To move your eye muscles differently, first, focus on a screen, noting the tension in your eyes/face. Then, focus on something far away as this is the ONLY way to fully relax the ciliary muscles, i.e. use them to their full range of motion.
To add this to your daily routine, take close-looking breaks by adding some distance-looking time and if you can, position your workstation in a way that gives you window access.
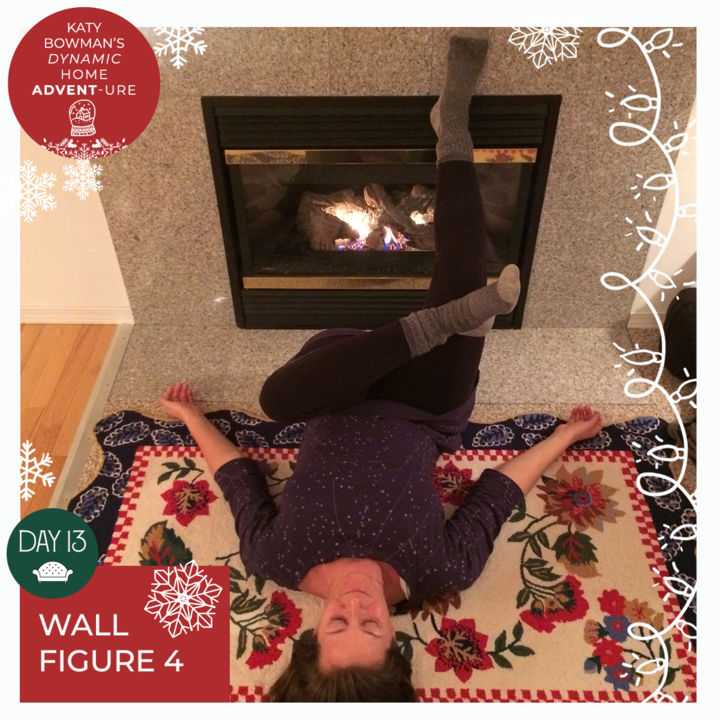
Day 13: Wall Figure 4
You know that stretch where you sit in a chair (or stand), cross one ankle over the knee, and then lean the pelvis and torso forward to find your piriformis and other deep hip rotators? You’re going do that move using the wall for support.
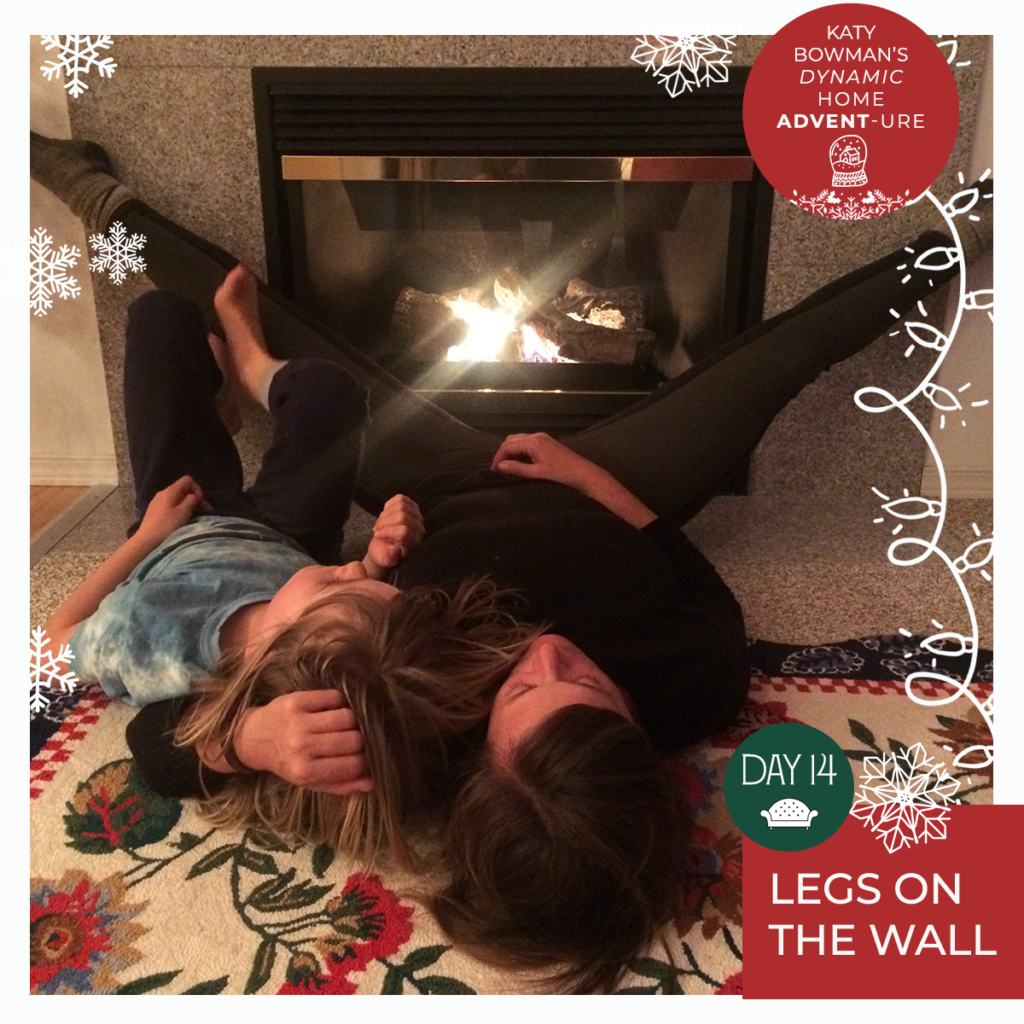
Day 14: Legs on the Wall
Are you still next to a wall? While you’re down there, give this move a try, and if you're not, then there's the BONUS of getting up and down from the floor a few times.
Legs On The Wall is effective but can also be relaxing. You can back your butt away from the wall if your hamstrings don’t allow much hip flexion—shoot for a neutral pelvis (one that isn’t tucked or untucked) and also put something underneath your head and shoulders if your ribs thrust a lot. Cycle between this and wall Number 4 for a #stackyourlife reading/restorative/snuggling routine, consider stretching your arms overhead or make "snow angel" type movements. Bend your knees and pull them to your chest and take as many breaks as you need.
P.S. I KNOW, I love things nice and toasty, but no, you do not need your mother's fireplace for this; a wall works juuuuust fine.
P.P.S This move is on my Nutritious Movement for a Healthy Pelvis DVD because the movement (or lack of movement) in the parts between your knees and ribcage can be big contributors to what the smaller muscles inside the pelvis area and aren't doing.
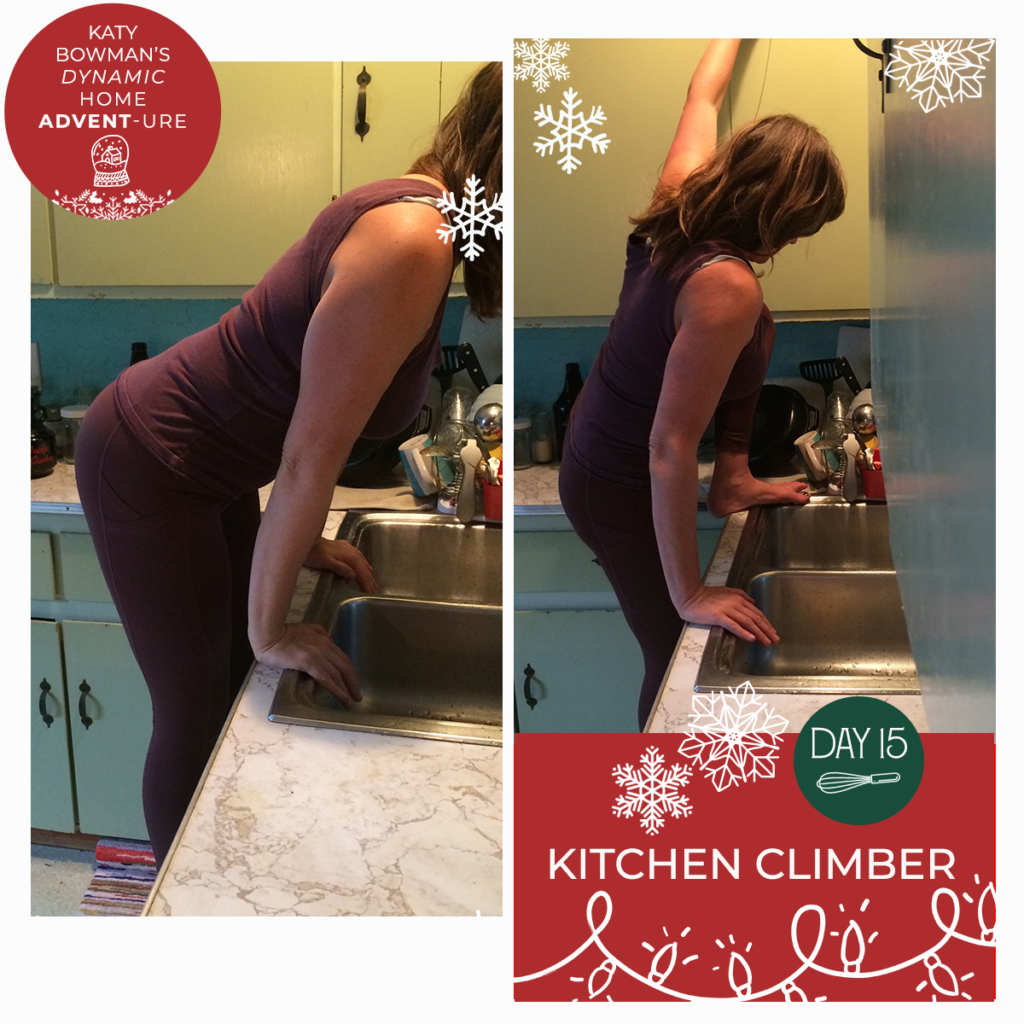
Day 15: Kitchen Climber
Don’t live in a jungle or jungle gym? I bet you’ve got climbing areas RIGHT UNDERNEATH YOUR NOSE that you didn’t even know about.
Start by pressing your arms into a counter, seeing if you can lift and hold the weight of your body. If not, practice this! Step two of the KC: Lift one foot and bring it to rest on the counter next to your hand. Try each leg one at a time. Make sure your kids watch you do this, and next time they climb on the counters, let them know how great those skills are.
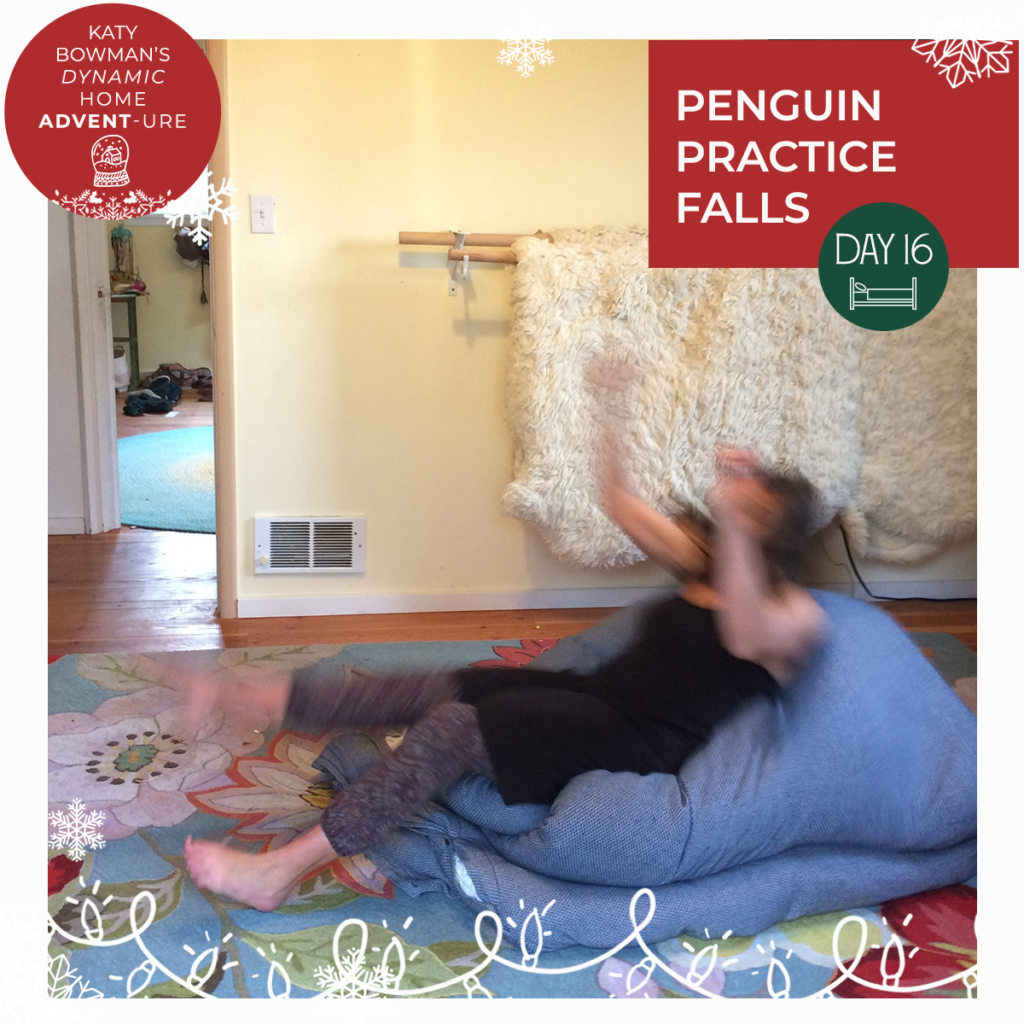
Day 16: Penguin Practice Falls
Falls aren’t only for stunt doubles; they’re a movement you can practice and perfect over time. And one benefit to having so many soft and squishy parts of our home is that we’ve got so many safe places to land!
On Elliot Royce:
“Royce, who is about six weeks shy of turning 96, falls on purpose at least five times every morning. “It’s part of my morning routine,” he said. “Just like shaving and brushing my teeth. I pull my air mattress out of the closet and practice safe falls.” Here’s your advent: Onto your mattress or pad (I sleep on the floor, so I’m using a stack of my bedding), practice Royce’s technique: “As you start to fall, bend your knees in the direction you are falling and twist at the waist, turning your shoulders away from the fall. That will change the point of impact. Instead of one spot on your hip taking the entire brunt of the fall, the force will be spread out along the length of your leg, thigh and pelvis. When you hit the ground, roll to further dissipate the force of the impact…[S]tart from your knees until comfortable with the ‘roll’ part of the procedure.”
Read more about the technique and see a video of it here.
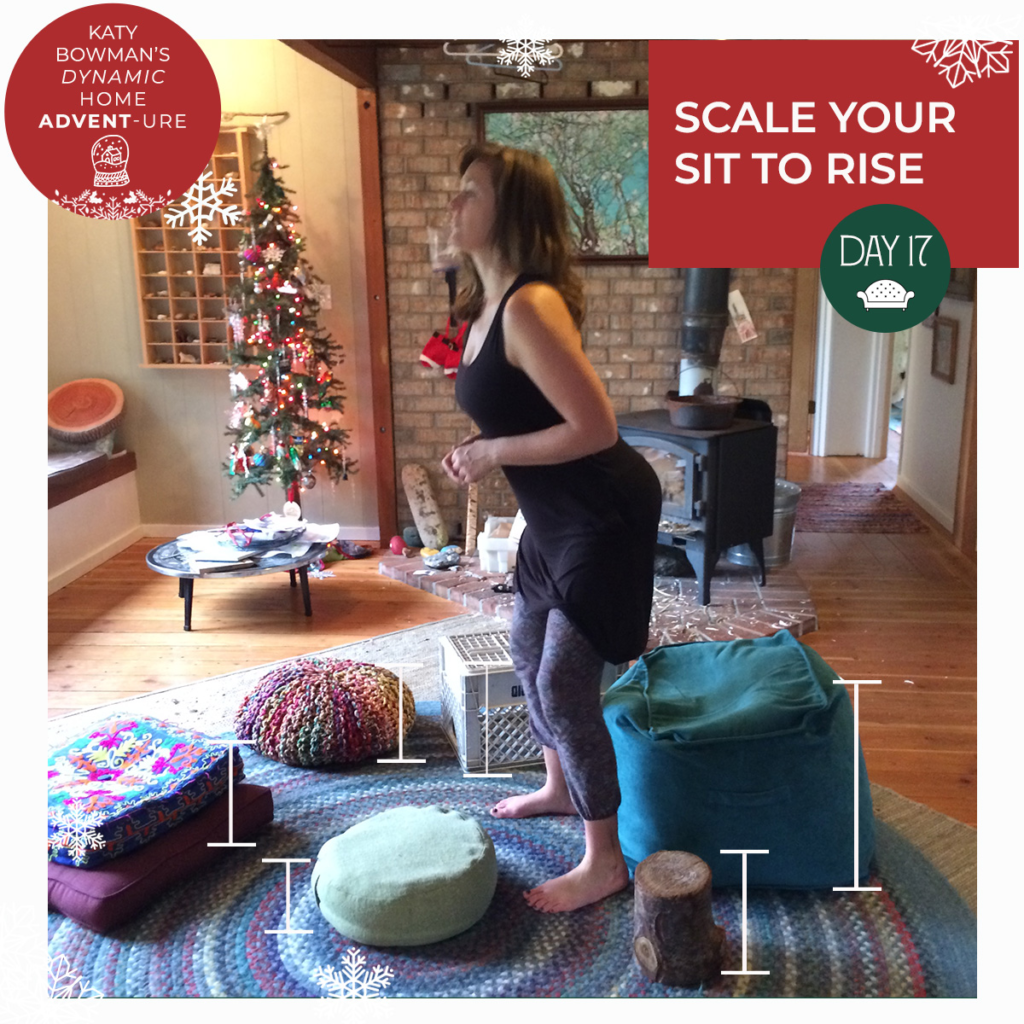
Day 17: Scale Your Sit to Rise
The idea behind floor sitting is that different sits use different parts in different ways. We tend to sit in the same way in the same seats and so the symptoms of sitting are sort of like repetitive use injury so to speak.
There's also the work of getting up and down. Floor sitting is surrounded with more movement, and really, anything in between the ground and where you most often sit right now, holds new-movement potential.
Check out all the seats in your house and work to find the the exact height of seat/seat-bolster combos that allow you to rise without using your arms or much leaning or momentum. Maybe it's the floor and maybe it's something a few inches shorter than what you're used to. Whatever it is = more movement. Once you've found something, keep it out to encourage you to use it.
P.S. No special equipment is required here! I have cool cushions because this is our "furniture,” but pillows, ottomans, crates w/a blanket, even stumps work JUST FINE.
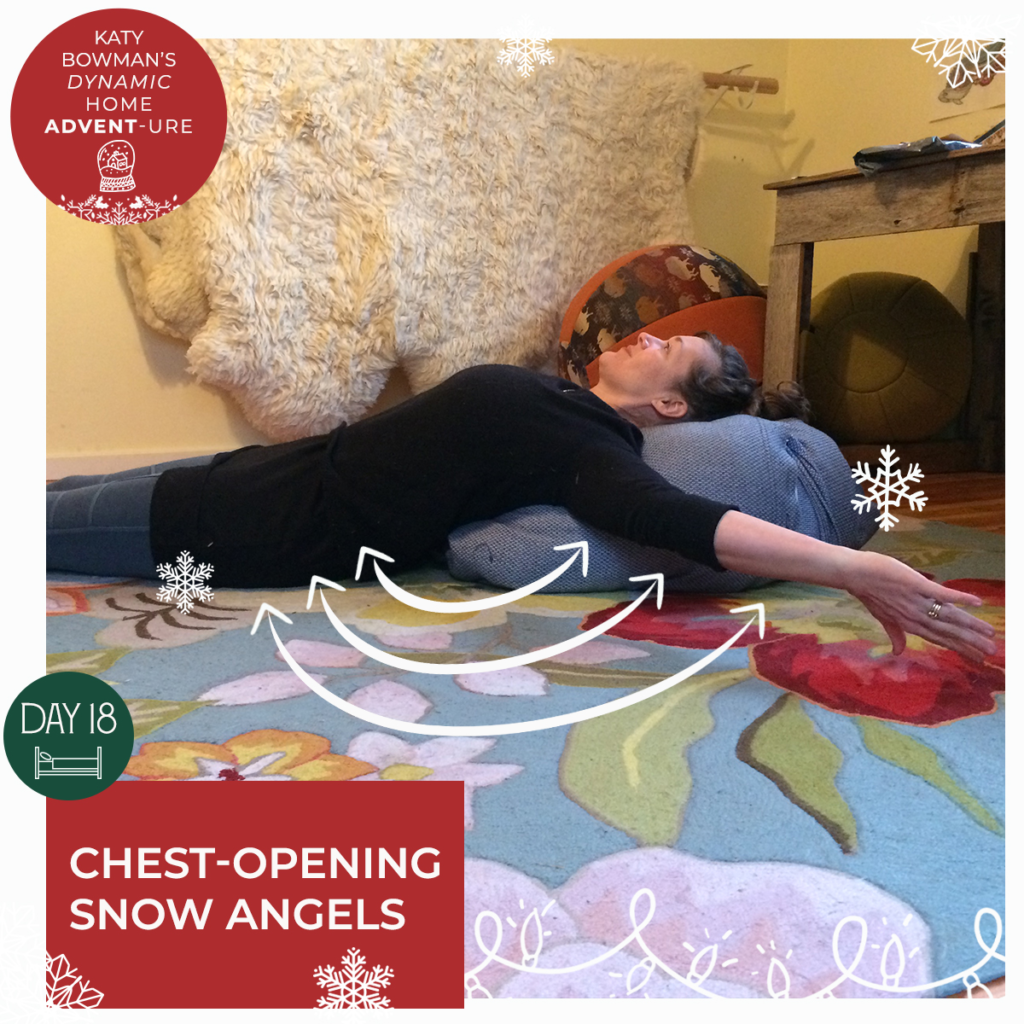
Day 18: Chest-Opening Snow Angels
It’s rare you need exercise equipment; you often have what you need to accomplish a move, you just have to think creatively.
Make a bolster-shaped mound of pillows/cushions/stacked towels and recline, letting your head and upper shoulders be supported (give your lower ribcage space to drop down into). Reach your arms out to the side in a “T” and make a snow-angel movement, taking your shoulders through an essential range of motion!
Once you’ve done that, put your arms back out into a “T” and rotate your upper arms backward (external rotation) so that your thumbs point toward the floor, and your elbow joints lift up toward the ceiling. Then repeat that snow-angel movement to move even more of your chest and shoulders.
Then, if you’ve got it, GO TRY THIS IN THE SNOW, PILLOWS NOT REQUIRED! P.S. You can find this move and 17 others on our NM Movement Multivitamin!
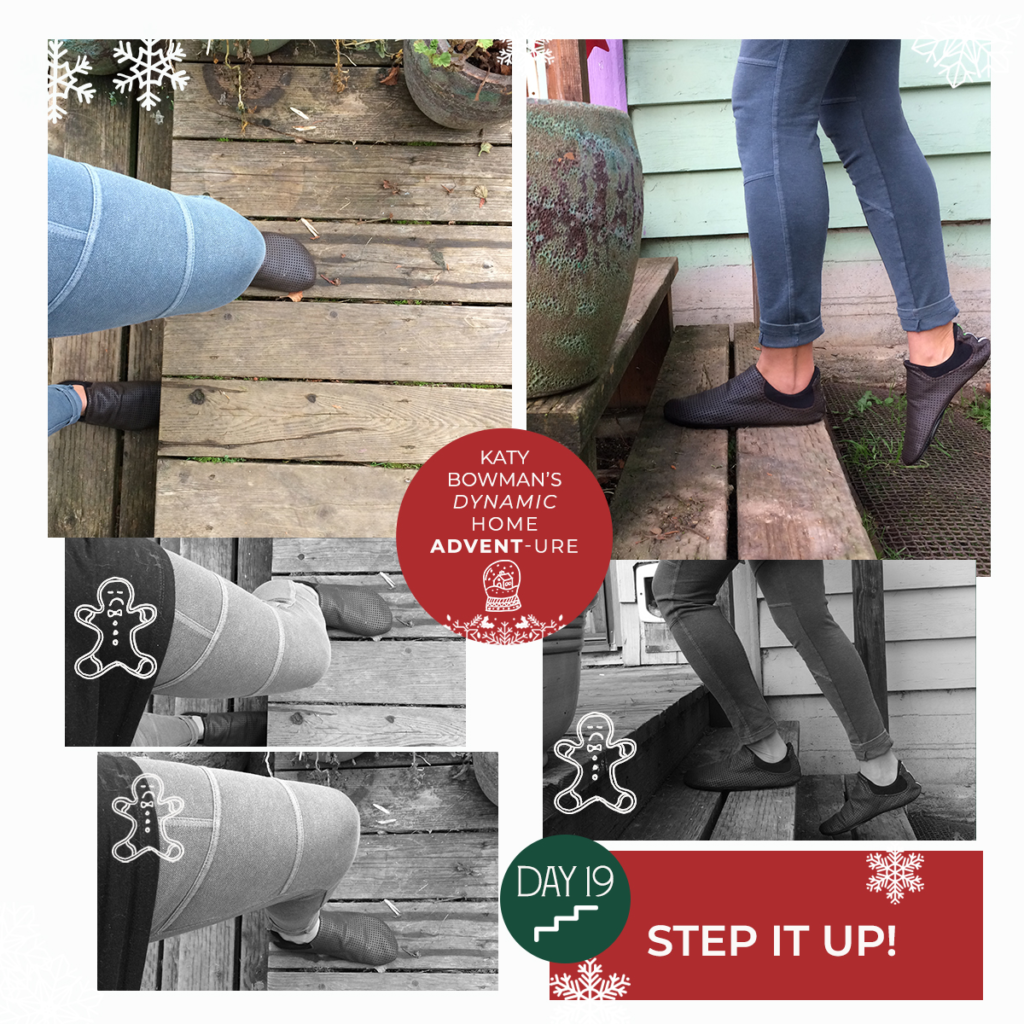
Day 19: Step it up!
Stairs are part of almost everyone’s environment, so here’s another way to use them to move you more (and P.S., this is a better way to take them if stairs hurt your knees!).
First, with your foot pointing forward, slowly step up and lower back down on your right leg only. Watch to see if your knee moves to the right (middle left photo) or left (bottom left photo) of your foot on the way up and down. The way it moves is likely how it moves whenever you’re going up or down the stairs. Repeat the step up/lower down, this time stabilizing your knee in line with your foot (top left photo).
Then, step up and down again, seeing if your knee moves FORWARD over your foot as you step up and down (bottom right photo). Set up your knee directly over your ankle (vertical shin) and see if the back of your leg is strong enough to get you up to that next step without moving the knee forward—a position that sets up your quads to get you up (top right photo).
Bonus: Don’t forget about the foot on the bottom step. The plantarflexion (toe point) is part of what gets you up the stairs, so if you can’t get up keeping your knee over your shin, bring more of the calves to your uphill!
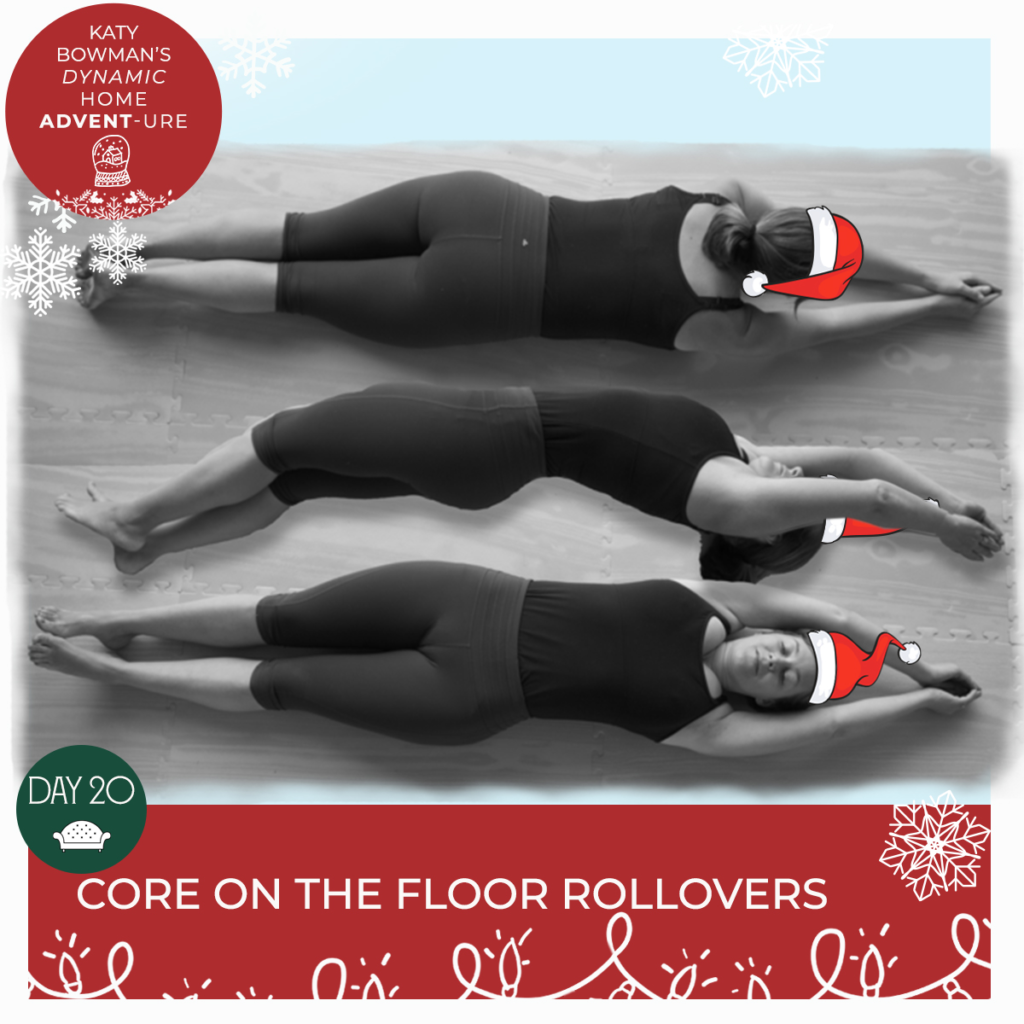
Day 20: Core on the Floor Rollovers
GOOD NEWS: You've likely have an exercise surface lining the bottom of your home, perfect for practicing rolling over.
This was likely one of your earliest movement challenges, but here it is again. Start on your back, arms overhead. Roll a half a turn until you're face down and one more until you're face up, then repeat in the other direction. HOW ARE YOU DOING IT? Repeat this a few times, taking note of how you're using your arms, legs, pelvis, head, orwhatever to get you moving. Are you falling part way? Can you control your roll?
This move CAN use the core, but it's often done not using the trunk at all (it's often done using arms or legs). It's possible to miss many of the benefits of this move! I want you to be able to start and control this move from your WAIST, but you need mobility between the ribcage and pelvis to get that done. Start the move by twisting the pelvis, and use those same parts to slow the descent as you roll over. Try it and report back!
P.S. You can find a VIDEO of me breaking down this move here. It's move No. 5 on the series of videos.
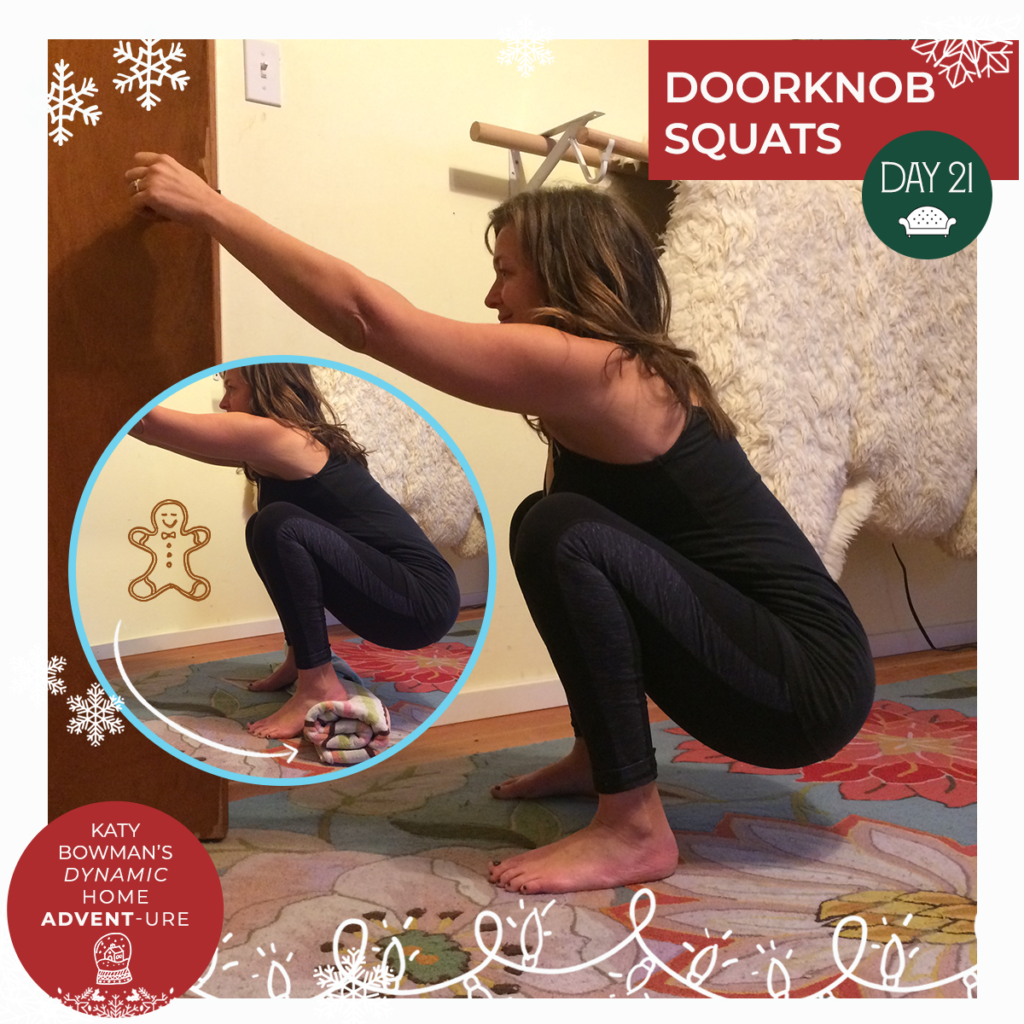
Day 21: Doorknob Squats
You can use your home-parts to remind you to move AND support you as you do.
I like this exercise to help the upper (thoracic) spine extend and hip joints flex more during a squat. If you're not comfortable squatting then you can also use this move to keep some of the weight forward when squatting (so it makes a nice bolster). Holding on to a doorknob (or a pole works too!), walk backward until, when you lower down into a squat position, you can put your weight in your heels and shift your hips right and left. The backward walking is key to getting more upper back and hip motion (try a pelvis "untucking" motion as you lower and rise to move more of your backside). Try different foot-widths and foot positions to see where your knees and hips want to move and where they don't.
If your knees and hips don't want to flex this deeply, try elevating the heels as in the insert pic to see if that makes a difference. HAPPY SOLSTICE SQUATTING!
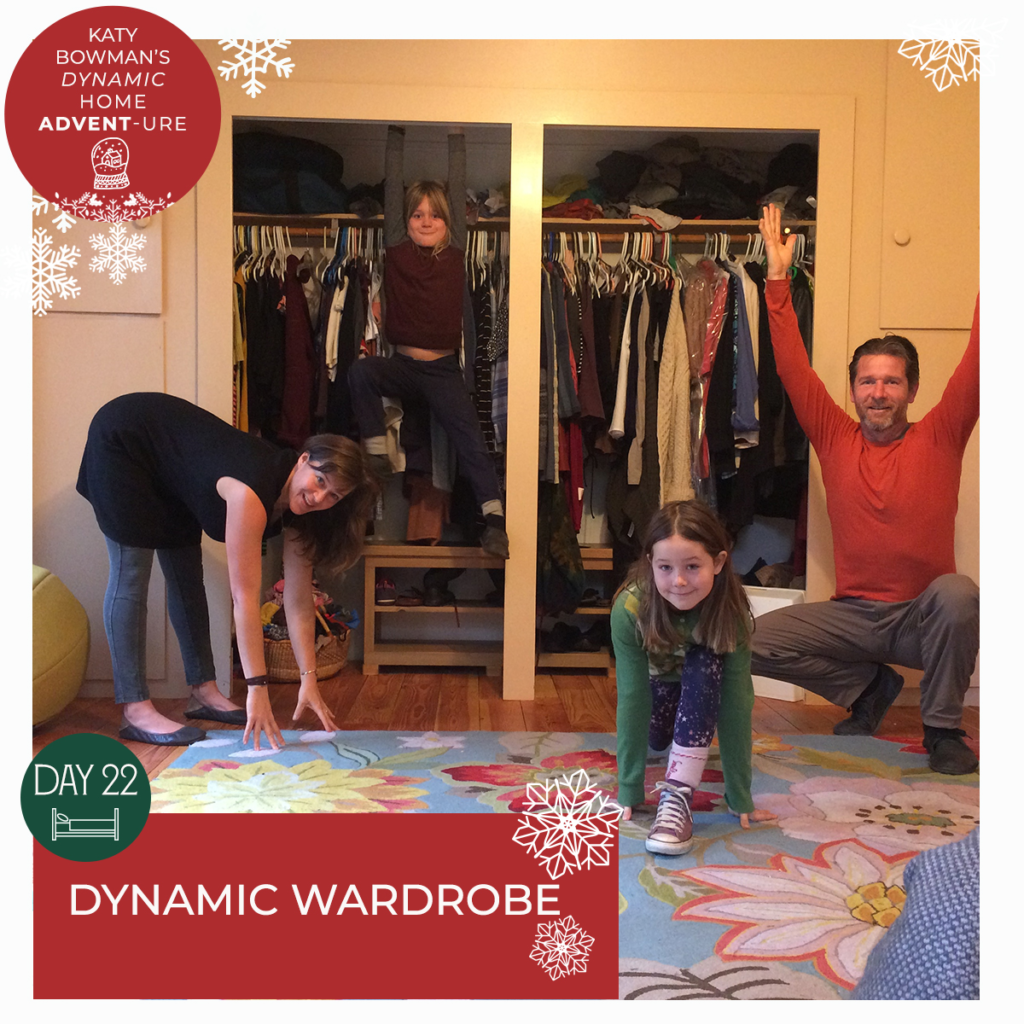
Day 22: Dynamic Wardrobe
You're moving in multiple environments each day, but the environment you're moving in most is probably your WARDROBE.
I've said it before, but I'll say it again: When we label clothing as "active" then all the parts of your wardrobe that don't it into that category are for when you're not moving. Luckily there's been a movement towards professional and leisure options that allow for more movement, and then there are also the choices we make dressing and buying clothes.
Today's move is to rank how dynamic your outfit is, follow the moves below and notice how your wardrobe lets you move (and maybe you can do this for everything in your wardrobe eventually)!
- Reach the right arm up, reach the left arm up, then try both
- Forward bend
- Bring your right knee to your chest, then bring the left knee to your chest
- Twist right, twist left
- Squat or crouch
Your clothing is an "exoskeleton" of sorts, similar to our homes, so going forward, take note of how you're setting yourself up to move...or not. Read more on the relationship between clothing and movement here.
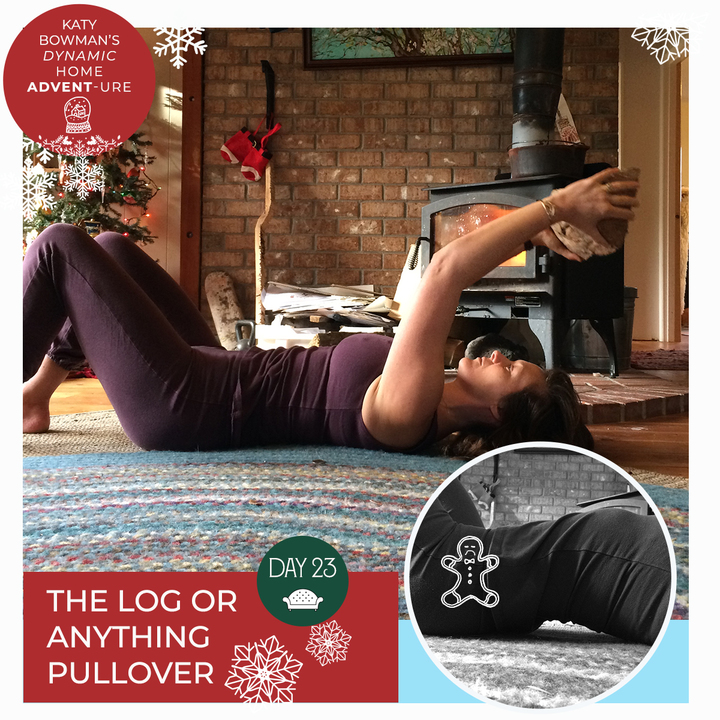
Day 23: The log or anything pullover
This is my favorite move from #DiastasisRecti because it's effective and maybe the most easily scaled "hanging/climbing" primer. You need a bit of floor space and something to pull over. Note: sometimes choosing something a bit heavier makes using your rectus abdominis easier.
This move can eventually become about the arms, but first, for us at #NutritiousMovement, pullovers are about the ability to stabilize the ribcage when you're using the arms.
Holding onto your weight well, slowing lower it overhead, keeping the ribcage down. Make sure that you're not mixing up "tucking the pelvis" with "holding the ribs in place"--those are different moves.
If you need to, bolster the head and shoulders to help keep the bottom of the ribcage from lifting. Go SLOW and note, the heavier your item, the more your arms and RA will work, but if your ribcage can't stay down, your load is too heavy. Increase weight on a stable frame! And also SMILE. You're moving a log back and forth over your body which is, let's face it, pretty hilarious.
Day 24: The Wrappin’ Up Upper Back Move
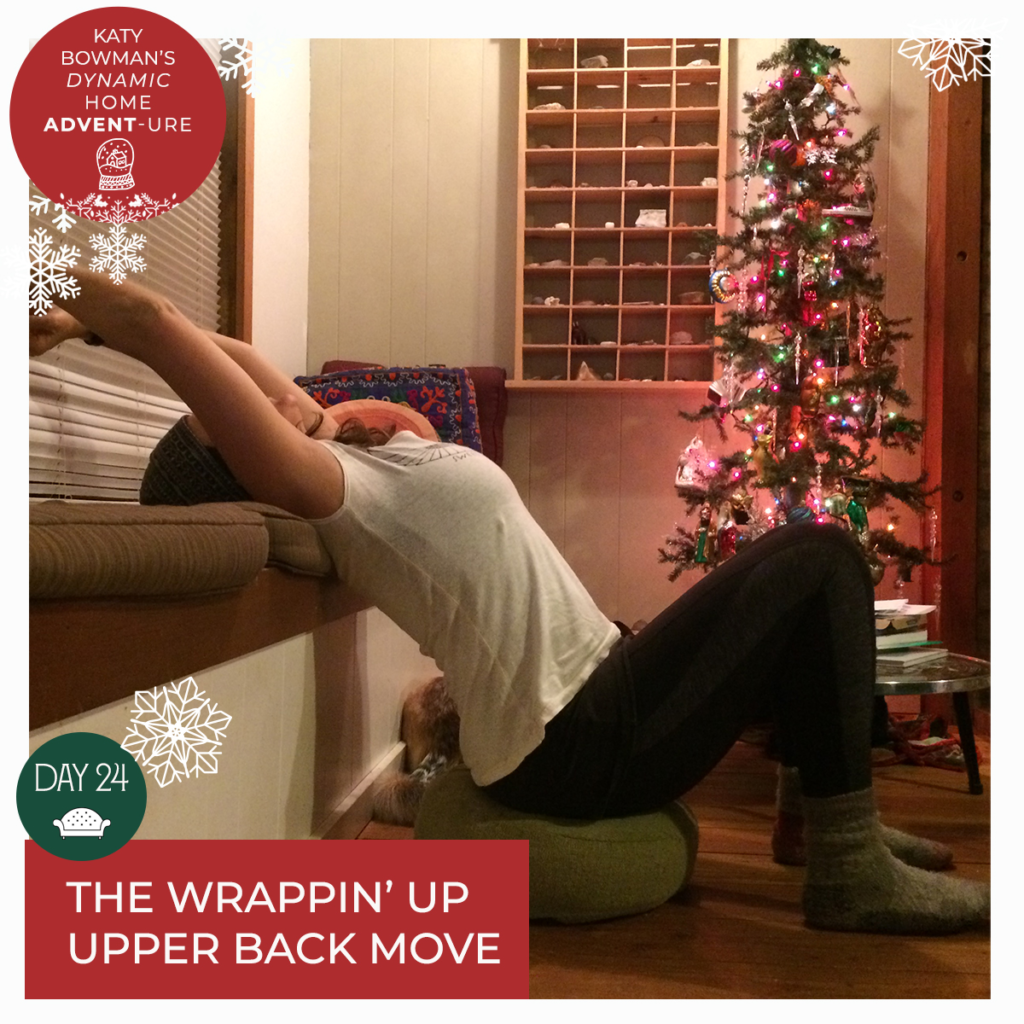
Friends, hopefully you can find 1) a minute and 2) a little set up like this -- the edge of a couch or put a ball behind you -- to WRAP UP this exercise advent with a little mini backbend!
Rest your body against a gentle edge and keeping your ribs down, recline back and reach your arms behind you. Support your head as needing, building a bolster as you go. A great move for a deep breath to prep you all for a new year! Try it a few times today and feel free to share the move with others!
